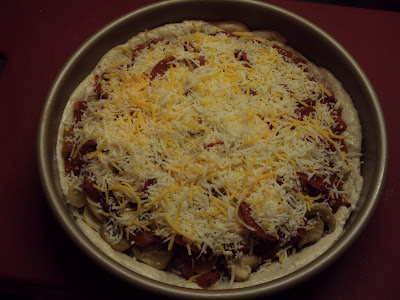
A few weeks ago I posted this picture on Facebook of an awesome pizza I made. People asked me for the recipe but I never pay attention when I cook so I couldn't really write it out for them.
Well, I made it again and this time I paid attention and took pictures! I was inspired by an episode of America's Test Kitchen where they tried to recreate Chicago deep dish pizza. As I watched them making the pretty labor intensive dough I thought to myself 'Hmm, that looks just like biscuit dough.' And boom! Inspiration hit. There are a few recipes out there for pizzas made with biscuit dough but most are pretty boring or really complicated. There aren't many for deep dish pizzas either, they tend to be more of a mini pizza made on flattened biscuits. Probably still yummy, but trust me, what I came up with is much better. This is a thick and hearty deep dish pizza that you make in a plain old 9" cake pan! The other plus side? This pizza is super inexpensive to make! Actual cost was under $7 for the WHOLE THING! Even if you don't have any assumed staples handy (like cooking spray or butter and Italian seasoning) it should still come in under $15 and you get at least 4 servings out of it. You can throw away your takeout menus now and thank me later.
Here's what you'll need:
- -butter, margarine or cooking spray for greasing your pan and coating crust
- -2 small (7.5 oz) cans of biscuit dough or 1 large (small ones are way cheaper)
- -1 28oz can of diced tomatoes
- -pizza seasoning or Italian seasoning
- -2 cups shredded cheese (your choice, I used an Italian blend)
- -Toppings of your choice- about 2 cups (I used mushrooms and turkey pepperoni)
- -THAT'S IT!
The first step, and you can do this hours ahead of time, is to open and drain your tomatoes. They need to be very well drained. I usually let mine sit in the colander for an hour or so and then put them on a paper towel lined plate to season them. I use Williams-Sonoma pizza seasoning but that's only because I'm obsessed with it. Penzey's has a great one as well. Any Italian seasoning blend will do really, but I'd probably throw in a little extra garlic and red pepper flakes. I suppose you could skip this step and buy pre-seasoned tomatoes, but I think this way is tastier. Make sure those suckers are almost dry so you don't get a soggy pizza!
 |
| <3 this stuff. |
When you're ready to start cooking, you'll want to heat your oven up to 400 degrees and generously grease or spray your 9" cake pan. I think butter or margarine is best for this. Sticking isn't much of an issue with biscuit dough but the butter/margarine will give a nice golden color to your crust and keep it from drying out.
 |
| I use 50/50 butter blend for everything. Butter taste, half the guilt! |
Next up is the crust! I prefer to buy two small packages of biscuits. This is because I'm cheap and these are usually under a dollar each. If you get a super deal on different ones, go for it. You're just aiming for somewhere around 15-16oz of dough for the right thickness of crust. Get them out of the cans and smash them all together. No need to be perfect and you don't need to do much kneading. You just want all the biscuits to be together without separating but you don't want to overwork the dough.
Once you've done that you'll grab your cake pan and press the biscuit dough down evenly towards the edges of the pan. This is going to be a little slow going because biscuit dough is springy. Have patience, just get it to the edges and let it sit for a couple minutes while you get your toppings together.

I used turkey pepperoni (so I could pretend it's healthy) and mushrooms for my pizza. I love fresh mushrooms but for some reason I get cravings for pizza with the canned kind. Since those are super cheap and zero effort, that's usually what I end up using. Just make sure they're drained really well! Now you're going to take a decent handful of shredded cheese and sprinkle it over your dough. Then press the edges up the sides of the pan about 3/4 of an inch. Pushing the cheese in will help stop the dough from springing back a little, but like I said before don't stress about stretching the dough too much. Just make sure you leave a good lip around the edge and it'll rise plenty in the oven, pushing the toppings towards the middle as it does.
Next, spread a little less than half of your tomatoes and a little more cheese leaving a half inch border.
Then add your toppings! Be generous, the crust of this pizza can be a little overwhelming if it's not stuffed.
Now pile on the last of your tomatoes, still making sure you have exposed crust all the way around.
Then go nuts with the rest of your cheese! You still want exposed crust but if a little cheese strays, it's ok.
Now you can brush the crust with olive oil or melted butter or spay it generously with cooking spray (for browning). Pop your pizza in the oven, after about 5 minutes at 400 degrees, turn the heat down to 350 and cook for another 20 minutes. You'll know it's done when your crust rises up and the edges turn golden. It will usually pull away from the edges a little at this point too. This is a good thing!

Once you take it out of the oven, run a butter knife around the edges to make sure it's not stuck to the sides. It shouldn't be, but sometimes stray cheese can stick a bit. Ok, ready for the one and only scary part? You'll have to 'turn out' this pizza in order to cut it without destroying your pan.
It's easier than you think, just make sure you give the pizza about 15 minutes to rest before you attempt it, otherwise you're gonna lose some serious cheese on top. Then pop a plate over the top and turn your pan upside down. It shouldn't take more than a wiggle to loosen it.
Then plop it back right side up on a baking sheet or another plate and dig in!!
 |
| Enjoy!! <33 |


