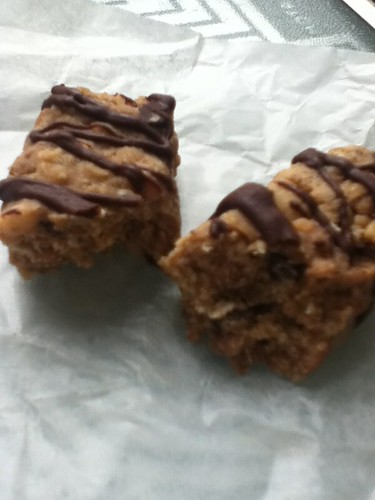
So, I'm happy to announce that my
great homemade protein bar experiment was a success!! This little guy is from my first batch... ten days later with no refrigeration! I've wanted to do a homemade protein bar for awhile now since most of the better tasting ones aren't gluten free and the list of ingredients on some of them is horrifying! My biggest beefs with all the recipes I had previously found were:
- They needed to be baked to death.
- They had a list of ingredients just as long and strange as the store bought kind.
OR (and this was the worst and most prevalent one)
- They needed to be kept in the refrigerator.
I'm sorry... but isn't the whole point of these to be quick, easy and portable? It seems pretty silly to make the effort if you need to keep them in the refrigerator all the time to keep them from becoming a sticky mess, doesn't it?
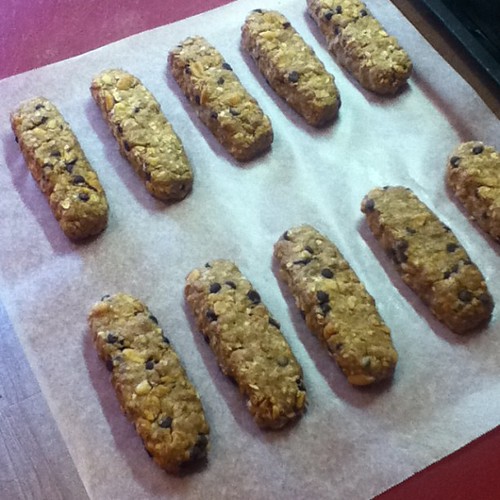
Needless to say, I decided it was time to throw my hat into the ring and figure out a better way to do these. Mine have only seven ingredients plus they are gluten free and vegan. The best part? TEN days after making a batch, they are solid, not sticky and still delicious with ZERO refrigeration!!
Here's day ten up close and personal:
 Ok, I'll stop gloating now and divulge all of my delicious protein bar wizardry. Here you go, friends:
Angela's super amazing no-bake, gluten-free, vegan and PORTABLE homemade protein bars
I have to warn you, the grocery list may be a little pricey for your first batch (protein powder is crazy expensive) BUT the good part is, you're only using a small amount for every batch of ten, so it still works out cheaper than the store-bought in the end. If you have trouble finding some things, I cannot recommend
Vitacost enough. That site has saved my life since I decided to go gluten free, I place an order at least once a month. They aren't paying me to say that, I swear!! Buuut, if you decide to check them out and
use this link, there's a nice little ten dollar credit for your first $30 order (and a matching one for me). I'll provide product links as well so you can see the nutritional information and prices, but those links won't give you the $10 credit. If you decide to make these, please please come back and tell me what you think! You can be my honorary long distance taste-testers. Feel free to ask questions and/or give me suggestions as well. I'm pretty excited about these just the way they are, but I'm always looking to improve!
Here's what you'll need:
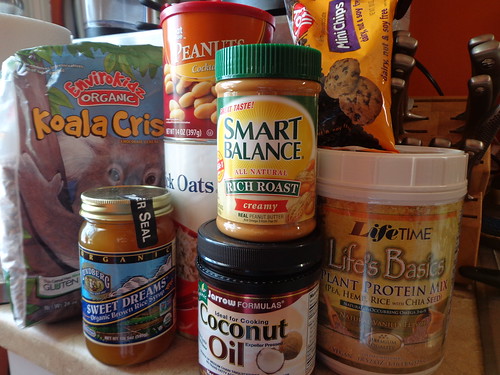 |
| note: coconut oil is only for the optional melted chocolate that I'll talk about later |
1 and 1/2 cups -
Gluten free Crispy Rice Cereal, like
Koala Crisp (I used chocolate, because it's delicious)
1/2 cup -
Peanuts or other nuts
1/2 cup -
Quick or Rolled Oats
2 servings -
Protein Powder (I use
THIS ONE because it's agave-free, dairy-free and the price is great)
1/4 cup -
Nut Butter of your choice (I went with peanut because I had it on hand)
1/4 cup -
Brown Rice Syrup
3 tbsp -1/4 cup
Add-ins like Mini Chocolate Chips (I used
these awesome dairy free ones)
- You could also use chopped dried fruit, seeds or extra nuts - anything shelf stable will do. Aim for just shy of 1/4 cup for proper yield
- Wax paper for wrapping. (Parchment could work too, but they may not hold up as well during the week)
Prep time - 20 minutes, Inactive (drying) time - about 1 hour.
Yield: 10 bars
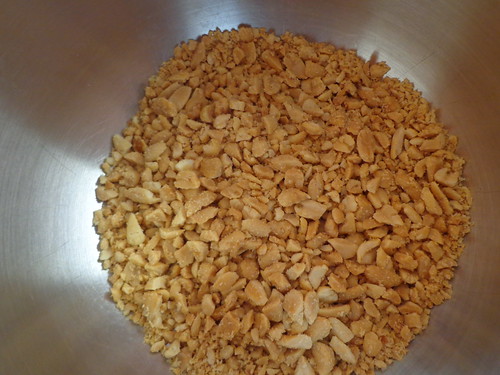
I like to buy whole nuts and chop them myself, it's easy and cheaper, plus they don't get stale as fast. You could buy pre-chopped ones if you wanted to save a little time. Otherwise, whiz them in the food processor for a few seconds or put them in a bag and hit them with a rolling pin... whatever works. For these, you don't want to go too crazy, the nuts are there to add texture so a few big pieces are fine... mine looked like this:
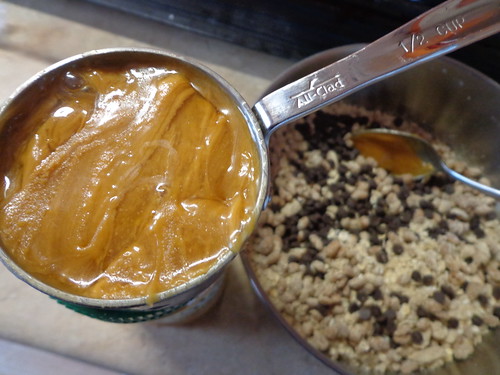
Throw the nuts with all the other dry ingredients in a bowl and then mix your nut butter and brown rice syrup together. If you're a crazy person, like I am, you'll mix them right in the measuring cup...
Now here's where the trade off for no baking and no refrigerating comes in. These are kind of a pain to mix. You need to work the nut butter and syrup all the way through the dry mix. It takes awhile and there's a lot of smooshing and bowl scraping involved. I promise, it's worth it. You want the mixture to start making little evenly distributed clumps, sort of like a dry pie crust mix with no big lumps. It should look like this:

Now you're going to add a tiny bit of water, 1 tbsp at a time, but no more than 4tbsp. You just want to moisten the mixture enough to hold together, too much water and they won't form bars. You'll know you're at the right consistency when there's no more dry protein powder hanging out at the bottom of the bowl and the mixture starts to stick to the spoon a little bit. It will look like oatmeal cookie dough at this point:

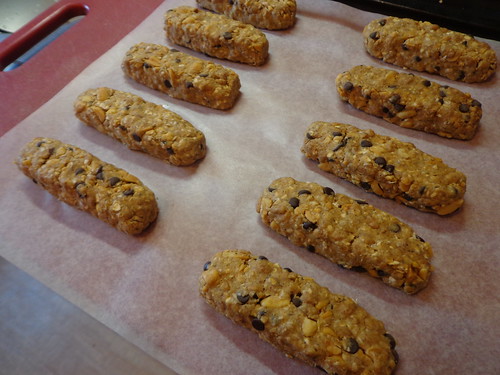
Now the fun part! Working with small handfuls form the mix into bars, really squeeze the mixture together, so they don't fall apart when they dry. Mine are about the same width as my middle and ring finger and a little longer because I just eyeballed it using that as a guide. They don't have to be perfect, or even in bar form, just make sure that they are compact. I got 10 bars with a tiny bit extra to sample... Lay them on a piece of wax paper or parchment and let them sit out so the outside dries up a little bit. I gave mine about an hour...
When the tops are dry to the touch, you can wrap the bars up in squares of wax paper and toss them in an airtight container or baggie. Mine lasted a full ten days with no refrigeration, in fact they probably could have gone a bit longer because the one I ate on the tenth day (that little guy in the first picture) still tasted perfect. Now, if it's really warm or humid where you are, you may want to store them in the fridge just to be safe. But they should travel perfectly well during the day once you take them out.
Speaking of the one in the first picture, you probably noticed the chocolate drizzle... I did that as an experiment to see if they would hold up. They definitely did! I just melted some extra chocolate chips and a tiny bit of coconut oil (to smooth and temper it) then drizzled away. I did the hour of drying (uncovered) in the refrigerator to set the chocolate, but then I took them out and held them at room temperature for the full ten days and they were totally fine. These wouldn't hold in really warm temperatures though, obviously. Chocolate + heat = big gooey mess.
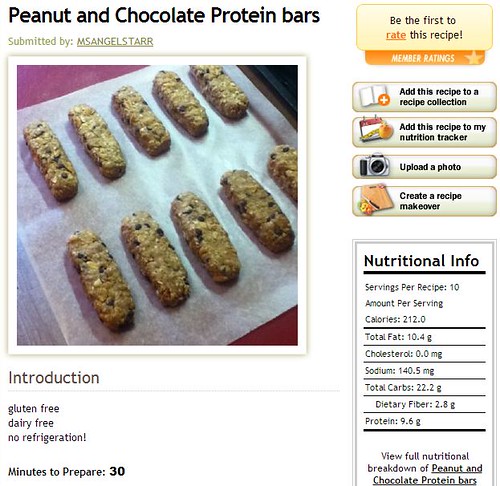
With the ingredients listed above, (same brand of protein powder, peanuts, peanut butter and 3 tbsp mini chocolate chips- *no extra melted chocolate*) these have 212 calories, 10g of fat, 22g carbs and 10g of protien! They come in really close to the Nature's Valley gluten free protein bars that I love- but these have less than 1/3 the ingredients and I know how to pronounce them all! If you sub chocolate chips out, you could adjust the carb and fat content a little. However, I have a severe peanut butter & chocolate addiction, so these hit the spot for me as is...
Again, if you try these out... and you should, right away... please come back and tell me what you think!